Approach
I’ve wanted to go stargazing for a while. Seeing a pure night sky, untouched by city lights or pollution, along with the Milky Way, has been on my to-do list for years. We decided to make the trip now, before summer ends and while skies are still clear. The location for our stargazing journey was Sunrise visitor’s center at Mt. Rainier National Park. Sunrise is regarded as one of the best night-sky viewing locations in Washington state for two reasons: distance from metropolitan areas and their associated light pollution; and elevation. At over 6000 ft (1.8 km) above sea level, there is less atmospheric distortion between you and the cosmic expanse above than there would be at lower elevations.
Driving up to Sunrise around sunset was in itself a gorgeous and worthy road trip. We made it up just in time to watch the sun set near the mountain, and proceeded to wait for it to get dark. I came prepared with my camera and tripod. As much as I’ve wanted to see the Milky Way, I’ve wanted to capture a picture of it even more. Astrophotography is incredible, and for an aerospace engineer, kind of on-brand. There’s nothing quite like the beauty of endless stars, galaxies, and nebulae, and the limitless possible worlds surrounding them. I’ve always found night sky photos inspiring; they remind me why I got into this field to begin with.
Milky Way

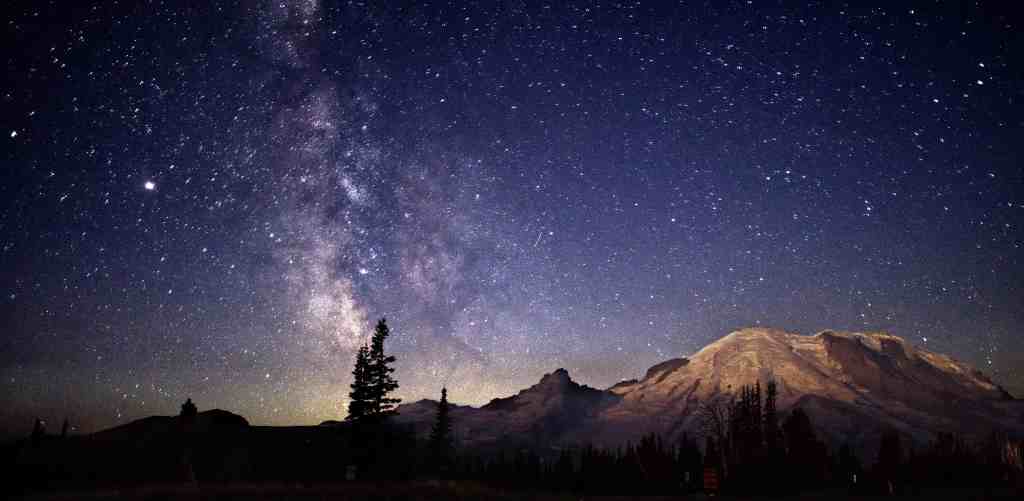
The Milky Way appears to the south in the Northern Hemisphere right now, and it shows up right next to Mt. Rainier from Sunrise. As a side note, the reason we can see the arm and core of the Milky Way so starkly from Earth is because our solar system is on one of the outer fringes of the Milky Way’s spiraling arms (the Orion Spur to be more precise). This allows amateurs like me to take cool pictures, but more importantly it allows Earth-bound and orbiting telescopes to image the Milky Way’s core so that astronomers can better understand how our galaxy behaves.
Since this was my first attempt, I really only got one photo (out of many) that had the right combo of exposure/aperture/ISO for a good edit. I now have a much better idea of how I should expose pictures for Milky Way captures in the future though (I used 10 sec exposure, f/1.4, and ISO 2000 for this one). I didn’t ramp up the ISO much in my other shots, and I wish I did. The higher ISO helped me get more of the cloudy/milky portion of the galaxy, and made bringing those details out much easier when editing.
I spent a decent amount of time learning how to edit a night sky photo. This was quite different from capturing NEOWISE or a sunset, since there was a lot more color balance and white/black level adjustment that had to happen to make the Milky Way really pop. I did some work on the raw file to set the color tones to something neutral, and to build up the contrast and clarity between the Milky Way clouds and the rest of the night sky. Modifying the “developed” raw photo required learning a bit about how Affinity does masking and adjustments (credit to Lauren for helping me figure out how to mask my adjustments correctly). The white/black levels and color balance adjustments were crucial to bringing out the band of the Milky Way, however.
I am incredibly happy with how this came out – from Mt. Rainier’s presence to the Milky Way’s band, this picture looks way better than I had anticipated for a first try. I would love to go back to Sunrise before it gets too snowy and get some more pictures. Timing is always tricky for these types of trips – we had about an hour after it got dark before the moon rose. The moon was so bright that it washed out most of the Milky Way to the naked eye, and to the camera lens. Going back during a new moon or crescent moon would be ideal, if weather allows this season. Until then, I’m pleased with my amateur attempt at capturing our galaxy.

Leave a comment